Yesterday saw our first wedding on the property. It was a true family affair for innkeepers Frances and Mike, with friends and family helping to create a wonderful and memorable day, complete with catering and a cake done by the Inn. Congratulations Frances and Mike!
Sunday, June 7, 2015
Thursday, May 14, 2015
Bridge over Babbling Brook
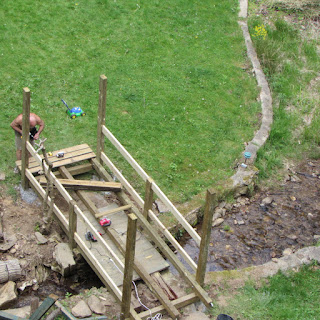
Visitors to the Inn can descend a gently sloping stairway down to the stream and pond behind the Inn. Once at the bottom of the stairway, a small wooden bridge draped in wisteria provided a picturesque crossing for the stream. Like so much else, the wood of the bridge had begun to soften over time and several of the boards and hand railings had come loose.
So, a few weeks ago, we began tearing down the old bridge and construction a new one over top. Recent floods have caused part of the stone wall along that part of the stream to collapse, widening the bed, which is turn allowed us to widen and the lengthen the bridge.
A new arbor was also constructed over the bridge for the wisteria to climb over and it now provides a lovely place to take pictures or just take in the view.
Friday, May 8, 2015
The Cherry Blossom Blooms
 |
| The Cherry Blossom room, as purchased |
When we purchased the Inn, this room was outfitted with bland carpet, fabric draped across the ceiling, and an inexplicable pink faux brick wall. Combined with random chestnut wall paneling, this room was truly a mystery. Did someone try to make that one wall look like brick on purpose? Why one cream colored wall and three dark pink (is that like the opposite of an impact wall)? And, most importantly, what is under all that fabric?
 |
| Lining up drywall |
 |
| Painting the cherry blossom room |
 |
| Prepping to fill in gaps in the wood paneling |
 |
| Putting together the bed (with a little help) |
 |
| Matching the new pine |
Next up was the floor, which was sanded, repaired since a few boards on one side of the room had gone soft, and then stained and sealed. The hardest part? Trying to match the new boards to the old.
The last major part of the remodel (since we’ve already done the floor and the walls, was the ceiling, which was a challenge between the popcorn and the holes. We covered the ceiling and added a new ceiling fan/light fixture.
 |
We used a styrofoam tile designed to look like pressed tin ceiling tiles in both the bedroom and ensuite bathroom. Oh, what was wrong with the bathroom? Just this.
 |
| The Cherry Blossom bathroom (mostly) before |
Terrible? No, not really, but the large glass panels that walled the bathroom were starting to crack, there were FOUR different building materials used in the shower, and more holes in the ceiling from those wonderful pipes. Behind the glass sheets lay cement walls, so we set out drilling drywall into cement, laying a new tile floor, and re-tiling the shower with white tile.
 |
| Retile in process - all one color this time |
 The door to the bathroom, like the door to the bedroom, was also damaged, but the bathroom door was salvageable, so we did a quick repair and channeled our inner artist.
Another beautiful handmade vanity and etagere were constructed using pallet wood and the bathroom was finished off with all new fixtures
 |
Saturday, May 2, 2015
Deck Remodel
One of the greatest features of the Red Leaf River Inn is the huge wooden deck that overlooks the pond and lower lawn. The deck wraps around two sides of the house and has its own access via a staircase from the main floor.
Sadly, like much of the Inn, several years of neglect were showing on the deck. Leaking gutters and piles of leaves left to rot around the deck contributed to the staircase and about half of the deck deteriorating to the point of being unsafe. The staircase was knocked down early last summer due to safety concerns, but the deck was put on the back burner as we repainted and dealt with plumbing issues. Late last winter, we were finally able to tear apart the soft parts of the deck and begin to rebuild.
A local contractor came to help lay the support beams and set the staircase, which we reconfigured to take up less deck space. We also expanded the stairs down to the upper lawn, wrapping them around the corner of the deck to create more space and a grander entrance. Next up, we will re-lay the stone path around the deck and fill in some landscaping in the gardens next to the deck.
Subscribe to:
Posts (Atom)


